Showing posts with label wreath. Show all posts

Thursday, June 14, 2012

Summer Wreath

Now that we're in the middle of June, I decided it was time to take my spring wreath off of the dining room table, where it has been in the construction phase since April, and finish it for my front door.


This was the least expensive wreath I've ever made!  Want to know why?  I used plumbing piping from Home Depot to make the form.  It costs $0.97.  Everything else I already had, so for $1 I have a wreath that I love!

I don't remember what this stuff is really called, but you can find it in the plumbing aisle of the store. There is a slit in it {see picture below}, but that doesn't affect its ability to perform as a wreath.
I am NOT going to take credit for the idea to use this stuff.  I first read about it on East Coast Creative's blog.  I've also seen pool noodles used in the same way.


When I shaped the tube into a circle it was a tad too large, so I just snipped it and cut out the excess tubing.


Using a little packaging tape, I taped the ends together to make my circle.


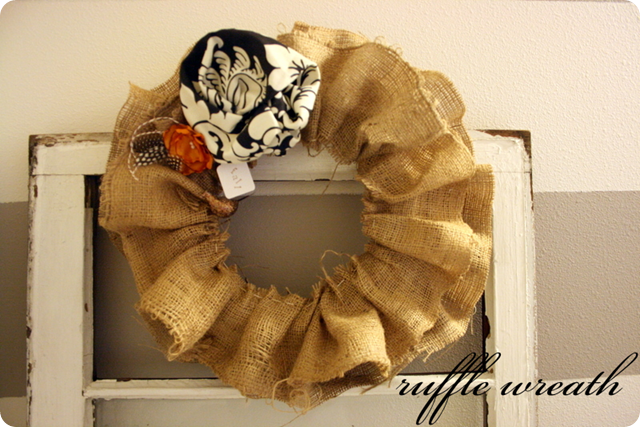
Then, I wrapped the entire thing with strips of burlap {my never-ending supply}.  No glue required, just kept wrapping it around tightly so that it stayed in place.


Be sure to work with burlap in a place where you can clean it up, because it sure does shed and leave a mess!


I made two different kinds of fabric flowers, attached brooch pins to the back and placed them on the wreath.


 Each of these fabrics are either tablecloths or napkins that I have used in pillows and other decor in my home.  Never forget to look at non-traditional ways of purchasing fabric!  I wanted to tie my front door in with the interior of my home, creating a cohesion throughout.

 
 I hung it with a rustic looking piece of the yellow fabric, simply just tied in knots, nothing fancy!


And, here is the photo of the missing element from this post.  I didn't go with the 'W' as several of you thought, but perhaps some other time.


Thursday, September 29, 2011

Felt Flower & Burlap Wreath

Several weeks ago I woke up one morning and decided we needed to purchase some fall crafting supplies.  A few hours later, the girls and I were out the door to visit just about every craft store in town.  I'm pleased to say that I didn't spend a ton of money, but did come home with some ideas and supplies for fall projects.  One such project was a wreath for the front door.


You may remember this wreath that I made for 4th of July


In case you're new here, I simply wrapped some burlap around a foam wreath form and attached fabric rosettes with safety pins.  You can read about it here.  Since I had used safety pins instead of glue, I simply detached the rosettes and had a blank slate to work with.

I found some felt squares at JoAnn's in these shades


They aren't the traditional 'fall' colors, but I liked the blue with the pumpkin orange color, and since my home is decorated with a lot of blues, I wanted that to tie in with my front door decor.

I found a tutorial here for making felt flowers and followed the instructions.  Basically, you cut a circle out of felt and continue to cut in a spiral form until you reach the end of the circle.  


You end up with a long strand of felt and this becomes your flower.  

The center of the flower should look like this


Gather the center in and then continue wrapping the felt around itself, tightly, to form a flower shape.


this is the underside of the flower

Once you reach the end it should look like this:


The great thing about these is that they don't have to be perfect.  See that extra bit of felt sticking up?  Well, once you finish the flower, you can simply cut off these imperfections to make it look better.


I used three different colors of felt and cut different sized circles (the bigger the circle the bigger the flower) until I had the amount I wanted.  

Now for the glue gun!  I placed a little bit of glue in random spots on the felt to make it hold together.  Then, I cut a piece of felt big enough to cover the entire back of the flower.


Then, I applied some hot glue to the flower.


Pressing tightly, I attached the piece of felt to the back and trimmed it to size.


I wasn't sure exactly how I wanted the flowers to look, so I just placed them on top of the wreath until I found what I wanted, and then took a picture so I would remember.


As I was looking for some more glue sticks to finish the project, I came across some brown yarn, so I decided to use it as well.  I just wrapped it around the wreath and sort of made an 'x' with it in different spots.


Instead of attaching the flowers with safety pins this time, I decided to go ahead and just glue them on.  Hopefully I won't have the heat issue I did over the summer, which caused my wreath to fall apart.

Here it is on the door and I love it!


Linking to:
Not Just a Housewife
My Uncommon Slice of Suburbia

Sweet Little Gals'


Friday, July 1, 2011

4th of July Wreath and a GIVEAWAY!


Being gone for a couple of weeks meant that some of my projects were put on hold, so I just hung my patriotic wreath last night, about 10 minutes before our company arrived!  Talk about last minute!  But, it's done and now I have one for next year all ready to go!


There are a billion burlap wreaths in the blog world, so this is nothing new, but I did something that I haven't seen before to attach my flowers.  Instead of using a hot glue gun to affix them on the wreath, I used safety pins.


Here are my three reasons why:

1. It's a bit more practical in that if I want a new wreath, all I need to do is undo the safety pins and add flowers with different fabric (or another accessory that strikes my fancy).  I don't want to keep buying wreath forms so this was the way to go on a tight budget.

2. Hot glue doesn't hold up so well in the heat.  When we came back from one of our recent trips, the new moss covered 'W' I had made for our front door was laying on the front stoop.  The ribbon that I had glued on had come undone!  I figured safety pins would be a bit more sturdy.

3. My husband recommended it and I like to make him happy.  My original plan was to attach the flowers with thread and tie it around the entire wreath, but when he suggested safety pins I thought that would be a perfect idea!  He's the best!

I'll be linking this interchangeable burlap wreath tip over at Home Stories A to Z.

GIVEAWAY:
2 YARDS OF BURLAP
To Enter: Become a follower of Only From Scratch 
and
 leave a comment on this post telling me you've done so.
(If you are already a follower, simply leave a comment on this post).
For a 2nd Entry, blog about this giveaway and leave a comment with a link to your post.
This is my way of encouraging you to 'get your craft on' as they say, for those who haven't.
And a way to help you crafty pros to keep at it!
All entries must be submitted by Thursday, July 7, 9PM.
I will announce the winner on Friday, July 8.
(Winner must have a US Mailing Address)


Here are some ideas to inspire you about what you can do with burlap:

Re-purpose Old Jewelry
via Tatertots and Jello
Erasable Menu Frame
via Under the Table and Dreaming by Stephanie Lynn
Burlap Table Runner
via Living with Lindsay
Ruffle Wreath
via Jones Design Company
Burlap Stocking
via Cozy Cottage Cute
Cover a Lampshade
via Living with Lindsay and Beneath my Heart

There are a million things you can do with burlap, so enter now!