Tuesday, May 31, 2011

Anthro-Inspired T-Shirt Refashion

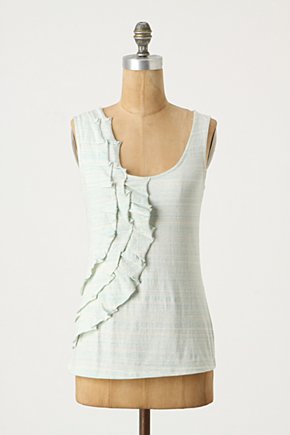
The other day I bought a $4.98 long-sleeved t-shirt in the clearance rack at Target.  I was inspired by this $48 shirt from Anthropologie:
The Inspiration
After some cutting, sewing, pinning, folding, more sewing, and ironing, this is what I ended up with:

My version
For $5, I'm pleased.  
Here's a mini-tutorial of what I did:

 I purchased a t-shirt from the clearance rack at Target.

I didn't want to buy two, so I found one with long-sleeves, hoping the sleeves would work for what I wanted to do.

 I cut off both sleeves, just shy of the seam where the sleeves were attached to the shirt.

 Next, I cut each sleeve open, along the serged seam of the sleeve.

This would be the fabric from which I would make the 'waves' on the side of the shirt .

I cut both sleeves in half, lengthwise, along the existing crease; I now had four pieces of fabric to work with (in th end I only used 3 pieces). To make sure that all of the material was without stitched seams, I cut off all serged portions of the sleeves.

I pinned the armholes, and sewed them back so they would have finished edges.

Using one piece of my sleeve material, I folded it at the top, lined it up with the seam at the top of the shirt, and pinned it in place.

I continued to pin along the outer edge of the armhole, folding up and creasing one section at a time until I reached the side of the shirt.  This was easiest to do by following the existing curve of the armhole.


 I then top-stitched it in place, as close to the armhole seam as possible.  Once sewn in place, I trimmed off the excess fabric from the wave to my desired width.

I repeated this process two more times, just placing each sleeve piece where I wanted it to fall on the shirt.  Once all three waves were sewn in place, I folded the ends along the side of the shirt and top-stitched right along the side seam of the shirt.


There you have it!  Hope you can find an inexpensive t-shirt soon and try your own refashion!

I'll be linking up over Sew Much Ado's We Did it Wednesday!  and Tea Rose Home's Link Party No.56.  Be sure to head over to these two blogs and check out all the projects people have done this week!

Pesto & Grilled Chicken Pizza


My basil started taking over the window box herb garden, so I decided to put it to good use and make some pesto.  Did you know that you can make pesto with nuts other than pine nuts?   I don't remember where I read this, but somewhere in my culinary research I stumbled upon this remarkable fact.  I used almonds as a substitute, but you can also use walnuts or pecans.

Here's the recipe for the pesto:

2 cups (packed) fresh basil leaves
1/4 cup slivered almonds
1 garlic clove
1/2 teaspoon salt, plus more to taste
1/4 teaspoon freshly ground pepper
2/3 cup olive oil
1/2 cup freshly grated Parmesan cheese

In a food processor combine the basil, almonds, garlic, 1/2 teaspoon salt, and pepper until finely chopped.

I put the garlic clove in whole and it chopped up quite well.
With the processor still running, gradually add the oil until the pesto is smooth and thick.

It will look something like this.
 Transfer to a bowl and stir in the Parmesan cheese.  Season with more salt, if needed.   (Cover and refrigerate for up to 2 days). This recipe makes about 1 cup.

Recipe adapted from Everyday Italian, by Giada De Laurentis


For the Pizza:
Roll out one unbaked pizza dough disc.  Spread desired amount of pesto on top (I used about 1/2 cup).


Place sliced grilled chicken, from 1 grilled chicken breast, evenly over pesto.  Sprinkle with 2 cups mozzarella cheese.

Bake in a 450F oven for 15-18 minutes, until cheese is brown and crust is cooked.

Monday, May 30, 2011

$5 Target Gift Card Winner


And, the winner is:

Maryn, Comment #17!  Congratulations, Maryn!  Email me at onlyfromscratch@gmail.com, with your address and I'll send you your new gift!  I have to agree with your comment:


Hello there! I love Target as well. The dollar spot always gets a good look over as do the clearance sections on the inside ends of aisles. I get giddy with doubling Target coupons with manufacturer coupons and I just generally love the flow and layout of every Target I have been in.


True Random Number Generator  17Powered by RANDOM.ORG

Sunday, May 29, 2011

JoAnn Fabrics Memorial Day Sale

Hurry up to JoAnn's through tomorrow for a great Memorial Day sale!  Extra benefits for those of us who can present a military ID.  Guess where I'm going tomorrow?!


via


This was part of an email I received from JoAnn's email list

Saturday, May 28, 2011

Homemade Dishwasher Detergent

In an effort to be a savvy shopper, I've been using my coupons carefully over the past few months.  We don't buy a lot of packaged foods, so the coupons most helpful for me are for toiletries, paper products, and cereal.   I decided to try a new kind of dishwasher detergent, simply because I had a $1 off coupon and it was an eco-friendly brand.  I'm not satisfied with it.  So, I've begun the search for a new one.

Some of my search for new detergent stems from the fact that our second little, M, has extremely sensitive skin.  In an effort to relieve her of some discomfort, I'm trying to remove as many chemical products as we can from our home.  Guess you could say I'm going a little 'greener'.

I decided to give homemade detergent a try.  I found a recipe on Mom Advice and tried it out.  Here's the recipe:


1 cup of Borax (you can find this in the laundry detergent aisle at most grocery stores, Wal-Mart and Target)
1 cup baking soda
1/4 cup salt

Use one tablespoon for each cycle.  You can also use vinegar as a rinse aid by pouring into the appropriate compartment in your machine until it reaches the fill line.  Store detergent in an airtight container.

It cost me $0.67  to make this one recipe, and this one recipe will last approximately 20 cycles, equaling to $0.03 a cycle.  (I didn't include the price for vinegar in this calculation, but one large bottle from Wal-Mart is $2.32, and I'm pretty sure that would last you a really long time!)  Not only is this 'green', but it's also more economical!

For the skeptics:  I've been using this all week and my dishes are clean, glasses are spotless.  I even did one cycle without pre-rinsing, and I was shocked at how well it did!  I will probably continue to pre-rinse, but you wouldn't have to.  Why go to the trouble of making it?  It takes about 2 minutes to stir all of the ingredients together, so I think that's definitely worth it.  Even if you're an 'extreme couponer', you still probably spend more than $0.67 for a pack of Cascade tablets.

Let me know if you try it out!

I read some things that stated the type of water you have (whether soft or hard) can affect the quality of this recipe. 

Internet Crashed and Giveaway Extended

Yesterday we finally had some folks come to fix the drainage problems in our backyard.  Unfortunately, while doing that, they cut our internet cable!  We've just now gotten it fixed, which means I've been offline for over 24 hours.  Today was supposed to be the announcement of the giveaway winner, but since I'm a bit behind, I'm extending the deadline to enter until tomorrow, Sunday, May 29th, at 9PM.  I'll announce the winner on Monday.

Don't forget to leave a comment on the 50th Post Giveaway for a chance to win a $5 Target gift card.

Thursday, May 26, 2011

Chicken Gumbo


Here's another recipe for you that uses some of that leftover chicken from my how to roast a chicken post.  I make this frequently, as it's easy, healthy, and my family loves it!  Guess we cancel out the healthy aspect because we have cheddar bay biscuits on the side.  I figure we need something a bit more hearty, i.e. fattening, when we eat this light soup.  Wouldn't you agree?

Recipe:
2 tablespoons butter
1 onion, chopped fine
2 stalks celery, chopped fine
4 cups chicken broth*
1/2 green pepper, chopped fine
1 can diced tomatoes, with juice
slat
1 cup cooked chicken meat

Melt the butter in a large pot, add the onion and celery, and cook for about 5 minutes, stirring occasionally.  Stir in broth, green pepper and tomatoes.  Bring to a boil, then simmer for about 30 minutes.  Add salt to taste; stir in chicken and cook for 2 more minutes.  Taste to see if it needs more salt (mine always does!).  Serve in bowls over rice.

*I usually make my chicken broth for this using the carcass of the chicken.  Just put the whole thing (including any meat remaining on it) into a big pot and pour enough water in the pot to cover the chicken.  Bring it to a boil, then reduce heat to medium-low, and simmer for about an hour.  Remove the carcass from the water and strain any bones or skin that remain in the pot.  This makes the broth really tasty because it keeps all the flavors from the roasted chicken spices.  Then, once the chicken has cooled down a bit, you can remove the chicken meat from the bones quite easily.

Recipe adapted from The Fannie Farmer Cookbook

Cheddar Bay Biscuits


The Recipe:

2 cups flour
1 teaspoon salt
1 tablespoon baking powder
1/2 cup butter, cut into cubes
1 cup shredded cheddar cheese
1 tablespoon parsley flakes
1 cup sour cream
1/2 cup milk
3 tablespoons butter, melted
1 teaspoon garlic salt

Mix flour, salt and baking powder in a mixing bowl.  Using a pastry knife, cut in the cubes of butter until the mixture is crumbly.  Stir in the cheese and parsley flakes.  Mix in sour cream and milk until well combined.  Drop by spoonfuls onto a greased cookie sheet (this makes about 12).  Bake in a 400F oven for 9-12 minutes.  Remove from oven.  Mix the melted butter and garlic salt, then brush on top of the biscuits.  Serve immediately.

*Recipe courtesy of my sister-in-law


Wednesday, May 25, 2011

Sewing Closet

via


One of the things I love about our new home is the closet space!  Not only do Bradley and I have our own closets in our bedroom, but there's a third closet with a window.  When we walked through the home for the first time, it was only built to the point of having drywall, but we could easily tell that this extra closet would be a perfect sewing room.  I've never had a place to really store my sewing things, so whenever I would start a project, I would get it out, get set up, and about 5 minutes into it nap time would almost be over and I had to put it all away again.  Now, I can keep my sewing table set up, my supplies organized (hopefully!), and projects laid out.

It's not quite done, but here are some pictures of the progress:


Everything from the closet on my bed
Sewing table set up

Sorted and stored (the diaper box storage is not permanent.)


Bradley's dad was visiting last weekend, so he graciously installed an outlet (it was pretty easy to do because of an existing outlet on the other side of the wall) so now I can plug in my machines and work in here.

Yes, there's a little patching that was done, but I plan to paint this room, so it's okay.

The best part:


If I'm not quite finished with a project by the time my girls wake up from their naps, I can simply close the door and no one needs to know!

 I can't wait to finish organizing and decorating this space! 

50th Post Giveaway!

Blogging has been a desire of mine for over a year now.  In fact, I created this blog last fall and it took me 6 months to finally start writing on it!  This is now my 50th post, so in order to celebrate an accomplishment of mine, I thought I would do my first giveaway!


What am I giving away?  A $5 Target gift card.  It's a small giveaway, but I figure if I start out small my giveaways can only get bigger and better, right?  

Here's how you can enter for a chance to win:

Leave a comment on this post and tell me what you love about Target.  
If you are a follower of my blog, you can leave a 2nd comment for an extra chance to win.  OR, become a follower of my blog and leave a 2nd comment for an extra chance to win!


Deadline to enter is 9PM on Friday, May 27th.  *GIVEAWAY IS NOW CLOSED*

The randomly selected winner will be announced on Saturday.  
Limited to those with US mailing address only, sorry!

Tuesday, May 24, 2011

Dining Room Chairs

Yesterday I was ecstatic as I drove home with my newly acquired dining room chairs!!


They might be hideous now, but I have great plans for these four chairs (plus two others that I got for free last year).  I've been on the hunt for dining room seating since we moved into our house and it's been discouraging to find that chairs are expensive.  And the chairs that I like are very expensive.  Parsons chairs were always my favorites as I was searching for what would be the best in our home, but the cheapest ones I could find were about $100 each.  Now I have six, all for only $60!  Yes, it's going to take some time to tear off the old fabric and recover them, but it's worth it to me to have chairs that I will love. 

Have you scored any exciting CL or yard sale purchases lately?

Favorite Spaghetti & Meatballs


Right after we purchased our first home (almost four years ago--time flies...), a sweet friend gave me this cookbook as a housewarming gift.


I've enjoyed cooking Giada's recipes over the years, and one has become our favorite spaghetti recipe.  I've changed it a little from the original, but it is yummy.  It also freezes well, which is nice, because you can make a double recipe and have lots to freeze.

Sauce:
1/2 cup olive oil
1 large onion, finely chopped
2 garlic cloves, finely chopped
2 celery stalks, finely chopped
2 carrots, peeled and finely chopped
1/2 teaspoon salt, plus more to taste
1/2 teaspoon freshly ground pepper
2 (32-ounce) cans crushed tomatoes  (Note: I've yet to find a 32-ounce can, so I always use 28-ounce cans.  Please, let me know if you find a brand that comes in a 32-ounce size!)
2 dried bay leaves
1/3 cup sugar

In a large pot, heat the oil over medium high heat.  Add the onions and garlic and saute for about 10 minutes.


 Add the celery, carrots, and 1/2 teaspoon each of salt and pepper.  Saute about 10 minutes, until all the vegetables are soft.  Add the tomatoes, bay leaves and sugar, and simmer uncovered over low heat for about an hour.  Remove and discard the bay leaves.   Dip a small piece of bread into the sauce to taste for correct saltiness.  (Okay, so maybe that's not a necessary step, but it sure is yummy!)  Season the sauce with more salt and pepper to taste


If you use 28-ounce cans, this recipe will make about 7 cups of sauce; you will need 5 cups for the meatballs.

Meatballs:

1/4 cup dried bread crumbs
1/4 cup chopped flat leaf parsley
2 large eggs, beaten
2 tablespoons milk
3/4 cup grated parmesan cheese
1/2 teaspoon salt
3/4 teaspoon freshly ground pepper
1 pound ground beef or turkey
1/4 cup olive oil
5 cups sauce


In a large bowl, stir together the bread crumbs, parsley, eggs, milk, 1/2 cup of the cheese, and the salt and pepper.

Add the meat and gently stir to combine.  Shape the meat mixture into bite-size balls.


 In a large skillet, heat the oil over medium-high heat.  Add the meatballs and cook until brown on the bottom, about 3 minutes.  Turn over and brown the other side, about 3 minutes more.


Continue to cook until all the sides are brown.  Add the marinara sauce and bring to a boil.  Reduce the heat and simmer about 5 minutes.

Serve over your favorite noodles and sprinkle with the remaining 1/4 cup of cheese.


If you don't want to deal with browning meatballs on top of the stove, you can always bake them on a greased cookie sheet or in a baking pan, for 30 minutes in a 350F oven.  

Monday, May 23, 2011

The Vegetable Garden

We're so excited about our garden this year!  Most of our plants were started from seeds and then transplanted to the garden.  Among our plants are eggplant, squash, watermelon, beans, tomatoes, corn, etc.  Here are a few pictures of what's growing and how it looks right now.  Lord willing, we'll be able to reap an abundance this summer!

Tomatoes


Little green pepper

Squash blossom about to bloom

Butternut squash


Radishes

Blueberries


Zucchini 


Snow peas growing on the trellis Bradley built

Broccoli

Corn


Haricot vert

Cucumber


Raspberries, thanks to Bradley's mom who brought us 15 plants from her yard!

We're so thankful to have a yard once again and we've tried to really make this garden a family project; the girls 'helped' plant the seeds, they help us water the plants, and we try to teach them about the entire process.   It will be quite rewarding when we can sit down as a family and enjoy the harvest of our hard work!

What project(s) does your family have going on right now?