Showing posts with label holiday. Show all posts

Friday, January 27, 2012

How To: Valentine Heart 'Tree'

This morning I shared with you my Valentine's Day Mantel and mentioned two tutorials that would be coming.  Here's the first tutorial on how to make those little heart 'trees' you saw.  Normally I don't post twice in one day, but I wanted to post this before the weekend, so that if you're heading out to shop for some crafting supplies, and would like to make one of these, you'll have the tutorial.  It's not difficult at all, and you may already have most of the supplies somewhere in your house.


Supplies:
- Felt squares {you can find these at most craft stores or fabric stores, usually for about $.39 a piece}
-Scissors
-Heart shaped stencil
-Hot glue gun and glue sticks
-Twigs
-Vase
-Epsom Salt {or other vase filler}

1. Use your heart stencil to trace hearts onto the felt.  You can use a pen or marker, whatever will write on the felt, because you won't see the inked side once finished.  Cut out the hearts.

Please ignore my awful looking thumb nail!  {now that I'm drawing extra attention to it!}
2. Gather your twigs {mine happened to be leftover greenery branches from Christmas that I had intended to make a wreath with and never did it!} and determine how many you want to use per tree.  Also determine how many hearts you want per twig.

3. Fill vase with epsom salt and place twigs inside.  The salt will keep the twigs from moving around.  Another great filler would be Valentine colored M&M's, but I knew I'd be too tempted to eat them {Plus, we're using candy as a potty training bribe right now, and I didn't want my 2 year old climbing up to grab candy from my mantel decor for her success on the potty}.


4. Place a thin line of glue down the middle of the backside of the felt heart.  


5. Stick onto the twig, pressing gently to adhere.


6.  Repeat with remaining hearts and twigs.


And, here is the entire mantel:


No one will see my 'trees' from the back, but if you wanted to make this for a centerpiece or other spot where the backs would be visible, simply make double the hearts and place another felt heart on the other side, sandwiching the twig between two hearts.

Linking to:


Valentine's Day Mantel {that Cost Me Nothing}

The world of blogging has opened up a whole new world for me, including being less practical in my approach to holidays.  My college dorm was never decorated for anything, besides Christmas {it's probably a good thing I dropped out of the Elementary Education program.  My classroom would have been very boring--no cool bulletin boards, room decorations....}, and I've never really found it necessary to decorate my home for each holiday.  However, the more I've read blogs and browsed magazines, I've discovered that there is nothing wrong with having a bit of fun on these holidays!  And, I don't have to go crazy with it, spending lots of money and taking a ton of time to create something fun.  With just a little bit of thought, some planning, and creativity, holidays can be more festive and I'm finding that I like it this way.

When Beth, from Home Stories A to Z, announced she was hosting a Valentine's Day Mantel party, I decided I would go for it!  However, I didn't want to go out and buy anything in order to make mine.  This project was completely put together from things I already had, just spruced up a bit.


I tried taking this wall hanging down, but I don't like moving art around for the holidays, so I opted to put it back up.  Plus, there is an outlet behind it, so finding something that was large enough to cover that up was difficult.  I don't mind that it's there.


I'll show you how I made these little 'trees' in another post.  Super easy, and super cheap!


I have had this frame sitting on our entryway table for months, for the purpose of keys, etc.  It was the perfect participant with a little DIY art {chalk writes really well on thick scrapbook paper}.


I found these buckets some time last year, in the dollar bins at Target.  They can serve countless purposes, but best when not used as clutter in your craft closet, as mine were!  I'll also show you how I made those fabric 'poofs' soon.


What better way to express love than by a picture of the love of my life with me.  This photo was taken at my sister's wedding and I love it!

photography at my sister's wedding by Colling Photography

And, one last glimpse of the whole thing.  


Linking to:

Home Stories A2Z

Monday, December 5, 2011

Christmas Tablescapes

Last night our church held its annual Christmas dinner/concert, and it was wonderful!  This was our first year at the church so I wasn't sure what to expect, but I had heard that the food is always outstanding, and the decorations amazing.  I was not disappointed.  The beauty of the table decorations was that each table was decorated differently, by someone in the church.  We could sign up to bring our own dishes, silverware, glasses, and any table decor, and then we were in charge of decorating that table.  Not only is this fun for the ladies who participated, but it's also great on the church's budget!  No cost for table decorations or dishes, and we each cleaned our own dishes at home, so that saved on time and volunteers at the church.  I thought I would highlight some of the tables and point out what I liked about each one.  Hopefully, this will give you some ideas, if you're still considering how to decorate your table for the holidays.  Enjoy all the pictures!

This feather tree ensemble was really fun!  I'm not sure if she made these trees, but it would be an easy DIY project.  The ornaments and glass pieces nestled in the red fabric were beautiful.


This table had a great mix of traditional china with a modern centerpiece and it was pulled off beautifully!  Square placemats worked well on a round table.  I took these pictures before they dimmed the lights, so you can't see the full effect here, but there were little blue led lights under the silver trees and when they were lit added such a nice touch.


One of my friends decorated this table and I love how fun it is!  I love the dishes {from Target} and the table scarf and ribbon napkin rings glittered nicely.  Clear marbles held a silver tree/branch in place--great way to keep the color scheme while making it practical.


 I was a bit tempted to sit at this table so I could munch on candy during dinner.  What a fun way to incorporate the reds and greens of a traditional Christmas.


Some tables had favors for each guest, as you can see from the ornaments here.  I like how the ornament is incorporated into the napkin.


I LOVE the blues and silvers that are used in Christmas decorating.  This table was gorgeous and tied together so well from the napkins to the china, silverware, and centerpiece.  Beautiful.


I really love the centerpiece on the this table.  Simple, fun and classy.  Plus, each guest received a little package on their plate.


My friend, Cassidy, decorated this table and did a great job!  Her colors go together so well and I love that she added a Christmas word to her centerpiece.  The oversized ornaments are beautiful and I love the way she stuck little favors inside of the glasses. Great idea!


I had to include this tower of ornaments, as it would be simple to create this on a cake stand.  Throw in some fresh greenery and you're set!


This next table was mine.  I decided to go 'low budget' and opened up my sewing closet to see what I could find.  I discovered a piece of lime green fabric and then in my clothes' closet found a black scarf from a bridesmaid dress.  With a few silver ornaments, my china, some ribbon, and black placemats borrowed from a friend, I was done.  I had  a million ideas I wanted to recreate, but this one was quick, easy, inexpensive and I love the green/black/silver combo.


This table was truly stunning!  Even the wrappers on the candy tie in so nicely with the detail on the china.  Beautifully done!


So, there you have several tablescapes to inspire and enjoy.  What is your holiday table going to look like?


The Lettered Cottage

Friday, July 1, 2011

4th of July Wreath and a GIVEAWAY!


Being gone for a couple of weeks meant that some of my projects were put on hold, so I just hung my patriotic wreath last night, about 10 minutes before our company arrived!  Talk about last minute!  But, it's done and now I have one for next year all ready to go!


There are a billion burlap wreaths in the blog world, so this is nothing new, but I did something that I haven't seen before to attach my flowers.  Instead of using a hot glue gun to affix them on the wreath, I used safety pins.


Here are my three reasons why:

1. It's a bit more practical in that if I want a new wreath, all I need to do is undo the safety pins and add flowers with different fabric (or another accessory that strikes my fancy).  I don't want to keep buying wreath forms so this was the way to go on a tight budget.

2. Hot glue doesn't hold up so well in the heat.  When we came back from one of our recent trips, the new moss covered 'W' I had made for our front door was laying on the front stoop.  The ribbon that I had glued on had come undone!  I figured safety pins would be a bit more sturdy.

3. My husband recommended it and I like to make him happy.  My original plan was to attach the flowers with thread and tie it around the entire wreath, but when he suggested safety pins I thought that would be a perfect idea!  He's the best!

I'll be linking this interchangeable burlap wreath tip over at Home Stories A to Z.

GIVEAWAY:
2 YARDS OF BURLAP
To Enter: Become a follower of Only From Scratch 
and
 leave a comment on this post telling me you've done so.
(If you are already a follower, simply leave a comment on this post).
For a 2nd Entry, blog about this giveaway and leave a comment with a link to your post.
This is my way of encouraging you to 'get your craft on' as they say, for those who haven't.
And a way to help you crafty pros to keep at it!
All entries must be submitted by Thursday, July 7, 9PM.
I will announce the winner on Friday, July 8.
(Winner must have a US Mailing Address)


Here are some ideas to inspire you about what you can do with burlap:

Re-purpose Old Jewelry
via Tatertots and Jello
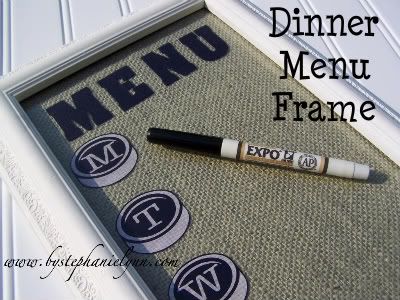
Erasable Menu Frame
via Under the Table and Dreaming by Stephanie Lynn
Burlap Table Runner
via Living with Lindsay
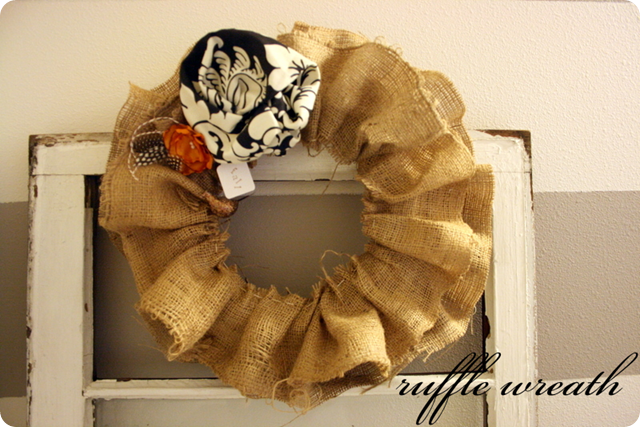
Ruffle Wreath
via Jones Design Company
Burlap Stocking
via Cozy Cottage Cute
Cover a Lampshade
via Living with Lindsay and Beneath my Heart

There are a million things you can do with burlap, so enter now!