Showing posts with label furniture redo. Show all posts

Friday, February 8, 2013

Tufted Rocking Chair Re-do

Several pieces of furniture in our home have been given to us by Bradley's parents.  Not family heirlooms, but special pieces that were made in Togo, West Africa, where they served as missionaries for 16 years.  I love our woven dining chairs that sit around our kitchen table, the teak rocking hippo in Mason's nursery, and now I'm really loving this teak tufted rocking chair that graces my Master Bedroom sitting area.


This rocking chair was upholstered by a gentleman in Togo.  He did an excellent job with the original fabric, matching it up perfectly, tufting it quite nicely, and placing some decorative nailhead trim along the back.  This is the only before picture I could find.


When I decided to tackle this project, I did what any normal person would:  enlisted the professional help of my mother-in-law!  She is an excellent seamstress, and has done much more work with upholstery than I have.  Boy, am I ever glad that she did this for me!  I think it would still be sitting in disrepair.


Growing up I would always want to help my dad with a project.  I remember distinctly wanting to help him dig fence post holes.  He looked at me and said, "Lauren, it's a lot harder than it looks."

Let me just tell you that tufting a chair and applying nail head trim are both 'harder than they look.'  Don't enter into these projects lightly!  Much time and care are needed.


My mother-in-law did all but three of the tufts, so I can't take credit for that.  She even covered the original buttons, so we saved some money there.  I purchased the fabric at my favorite fabric outlet in town, and only paid $11.  It's a nice ivory color with a very subtle herringbone print.  I like how it contrasts with the color of the wood.


Stapling the fabric to the chair was the easiest part, and there was no sewing involved in this re-do, which is always a plus!

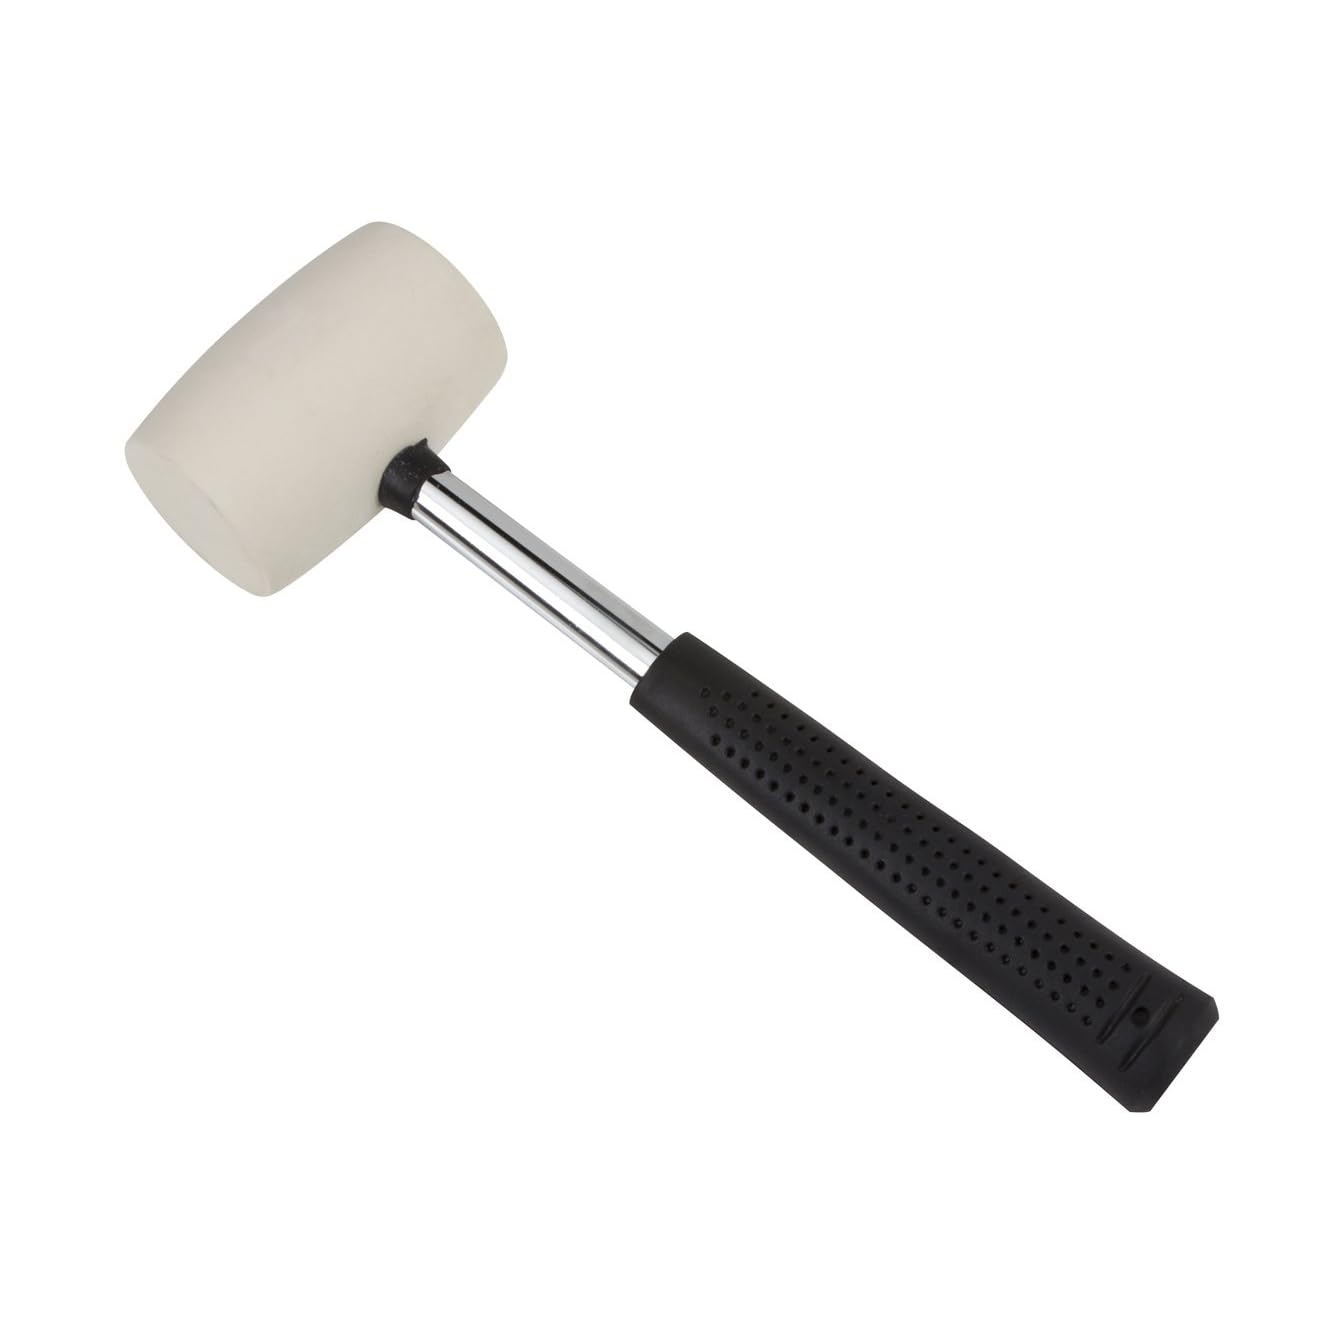
The nail head trim was my least favorite part.  If anyone is considering using nail head trim, please purchase one of these:
source

It made the job much easier, and it only costs about $6 at Joann's.

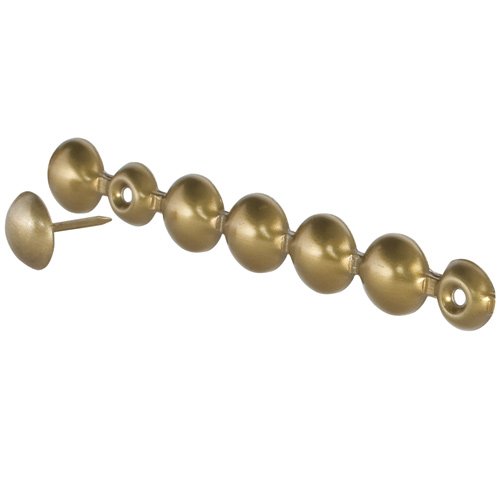
Next time, though, I think I'll splurge and buy this kind of nail head trim:
source
This is a 6' long piece of trim that you apply, hammering an additional nail every 5 nails.  It helps to keep the nails perfectly spaced and go in at the correct angle.  For $12, it might be worth it.

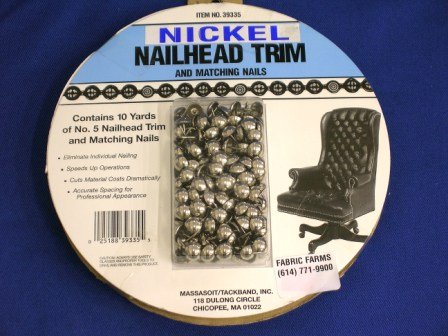
This kit, for $19, would also work:

source


You can see why this would be helpful for me:


I used a measuring device to place the nails equally apart, but even with that, they would hammer in the wrong angle, making them go in the wrong spot.  I probably should have gone back and fixed the ones that were incorrect, but the back of the chair faces the wall, so I'm going to live with it for now.  Plus, this way if I ever try nail head trim again, I can compare to my first nail head job.


Our Master Bedroom is coming together!  I'm still on the hunt for the perfect comforter/duvet.  And, I'm hoping to fix my bedskirt, which is not the right size and needs some ribbon to finish it off.  Slowly, slowly, things are getting done.  I hope to finish a lot of these final projects before our baby comes in July.  If I manage my time well, it should get accomplished in five months' time.

Happy Friday!

Linking to:
Furniture Feature Fridays

Thursday, November 8, 2012

End Table Meets Paris Grey

This summer I visited Studio Eleven, near my parents' home, and purchased a sample size of ASCP in Paris Grey.  I knew I wanted to use it on an end table in our Family Room, but it's taken me just a few months to get around to it.


I had read that a small jar of this would definitely cover an end table, but I was still a bit skeptical.  You would be amazed at how far this paint goes!


I was able to cover the entire table, plus had enough left over for another project {will share with you next week}, and hopefully just enough for yet another small project.  One small jar is only about $13, which is not too bad for a table, let alone three project re-dos.  If you haven't tried ASCP yet, I'd encourage you to purchase your favorite color in a small size and just go paint something with it.  You'll be happy you did.

When I stood back to take a picture of the table painted, I noticed that I needed to do something to the inside of the drawer.  You can see from the photo below that the wooden color inside was standing out just a bit too much from the front.


It just took a little bit of paint to coat the inside edges of the drawer so that the front looks much better.

After the paint dried, I used some fine grit sandpaper to distress the edges and a few spots on the front and back.


I wiped off the dust quickly and then applied a coat of clear wax.  I've used rags and paper towels before to apply wax, but this time I used a cheesecloth.


This was the best method so far.  There are specific brushes you can purchase for wax application, but they are rather pricey, and the cheesecloth worked great.


I'm happy with how it turned out.  Paris Grey is a lovely color, and the wax really deepens the blue in it.

One of the best things about ASCP for me is the quick drying time.  My kids were down for a nap at 2, and by 3:30, the table was painted, sanded, waxed, photographed, and back in its spot by the couch.  You can't beat a nap-time paint project!

Linking to:

Furniture Feature Fridays

Friday, June 15, 2012

Annie Sloan Chalk Paint Review & Studio Eleven

It was about 18 months ago that I started reading about chalk paint, a type of paint that can be applied without stripping, sanding, or any kind of prep-work.  I didn't really believe it at first, but the more I read about it the more I wanted to try it out.  Well, as I shared with you last week about the Dresser for the Nursery, I finally used it!  I've compiled a list of thoughts on this paint that will hopefully be helpful for those of you who may not have used it yet, but are considering it.

source

  1. ASCP saves a ton of time if working with a piece of furniture that needs some refurbishing.  It's true!  You do not have to do anything to your piece of furniture in order to apply this paint.  I couldn't believe how the paint adhered to the surface of my dresser as I was working with it.  I've painted {and stained} several pieces of furniture before and nothing usually goes on unless you've spent hours stripping and sanding the previous stain/paint.   
  2. Painting with ASCP is not for the careless.  I suppose I thought that since no prep-work was needed, applying this paint would be a piece of cake, basically just slapping it on.  Oh, boy, was I ever wrong!  You still have to watch for brush strokes, paint evenly, watch for drips, and basically just be careful painting, as you would with any paint.  My pre-conceived ideas on this were way wrong!  I painted my dresser while 37 weeks pregnant, and my hands kept cramping up because of carpel tunnel {which I get with each pregnancy}.  This made it even more difficult to get even strokes and make it look beautiful.  If you plan to use ASCP, just realize that it will require time to apply it and get it looking the way you want. 
  3. The cost of this paint is worth the investment.  My biggest hang up in purchasing ASCP was the cost.  It's pretty expensive for one quart.  However, when you add up the cost of stripping and sanding materials, paint, wax, etc., combined with the amount of time it takes to do that whole process, you might as well have purchased chalk paint.  I painted an entire dresser with only 1/2 of a quart of paint.  And, I'm planning on using the remainder on another piece of furniture.  
  4. There is definitely an art to using ASCP.  There are workshops in many stores where ASCP is sold to teach different techniques on how to use this paint.  I look forward to hopefully taking a workshop one day so that I can at least learn some aspects of how to do a better job at this.  
This last point brings me to the second part of my post.  I want to introduce to you a new store that opened up in my hometown.  When I was looking for a store from which to order my paint {ASCP is only carried in some stores across the US}, I came across a shop in Lynchburg, VA!  I couldn't believe it!  The listing said that they were due to open very soon, so I contacted the store owner to inquire about when I could purchase some.  Luckily for me, they were opening that next weekend.  So, I called the shop and ordered my supplies over the phone.  My order shipped THAT DAY {that's how awesome these ladies are!} and I received my brown paper package within a couple of days.  


Studio Eleven is located in downtown Lynchburg, VA.  When I was visiting my parents last week I stopped in the shop and had a look around.  Not only do they sell ASCP, but they also have many items for sale that they have painted with chalk paint.  The prices are quite reasonable.  Workshops are held in the store, several times a week, and the ladies that own the shop are incredibly helpful.  While I was in the store, one of the owners answered my questions about how to use the wax, and even shared with me a little tip that is normally covered in one of the more advanced workshops.  

The studio's business is doing so well!  They recently were covered in the Lynchburg News & Advance, and a local TV station even did a piece on them.  Because their business is booming, the website is still under construction, but will hopefully be up and running soon.  In the meantime, be sure to check out Studio Eleven, on Facebook, and you can certainly place an order for paint over the phone.  

This is a sample piece that is currently in the shop:


Sure, there are other stockists to purchase ASCP from, but if you don't have a store in your area and are considering purchasing some of this paint, why not use Studio Eleven?  I love supporting local businesses, especially ones that will keep my hometown growing.  If you live in, or near, the Lynchburg area, be sure to drop in Studio Eleven.  And, if you're thinking about giving ASCP a try, pick up a sample size of chalk paint and try it on a small piece of furniture. 

Now, what are you going to paint?


Friday, June 8, 2012

My First Chalk Paint Experience {the Baby's Dresser}

If you spend any amount of time reading home decorating blogs, then I'm sure you've run into posts about ASCP {Annie Sloan Chalk Paint}.  I mentioned in a previous post that I had purchased some and was planning to paint a dresser.  Well, it's finally finished and ready to share with you!


This is what it looked like before:


Sorry for the pictures!  I started this project at night, so the lighting was awful!  

I simply took off the hardware and spray painted it black.  Then, I used Pure White ASCP to paint the dresser and drawers.  Working with the chalk paint was great, but I definitely have a TON to learn about it!  Perhaps the biggest lesson I learned was that it's not really a great idea to paint a piece of furniture when you're 37 weeks pregnant and struggling with carpel tunnel!  I'll be writing up my own little 'review' of ASCP in a later post, sometime next week.  But, for now, I just wanted to share with you this finished project.  


Hope you all have a great weekend!

Linking to:

Furniture Feature Fridays

Friday, June 3, 2011

$5 Table Gets a Facelift

Last fall, before we left Monterey, we went to a once a month sale put on by Habitat for Humanity.  Habitat for Humanity has resale outlets in various parts of the country where you can purchase an assortment of home products that have either been donated or are surplus materials.  They sell building materials, light fixtures, toilets, appliances, tile, hardware, furniture...you  name it, they probably have it!  I'd encourage you to check out their website, here, for a list of store locations.  Any money they make at these sales goes right back into the community services of Habitat for Humanity.

We browsed through the goods that day and came out with this $5 end table:


Since we moved into our house we've been using it like this in the family room until we got around to finishing it.  In the meantime, the girls somehow managed to both stand inside of the drawer and break it.  Not only did we have to finish the table, but some minor damage repair took place too.  Here's what it looks like now:


This was a fun project for me because I got to use a real power tool!!  Sure, I've used a staple gun before, but this time I used the power sander, and let me tell you, that thing was great!  If you're thinking about re-doing a lot of furniture projects, I would recommend purchasing one of these.  I started out using a chemical stripper that you paint on and then rub off.  This was seriously hazardous!  The chemicals are so powerful that they burn your skin, even if just a spec of it touches you.   Because of the extreme heat we're having, I just had on shorts, a t-shirt, and some flimsy gloves.  BIG mistake!  Let's just say I was thrilled by the time my husband let me use the power sander.  (And, I'm equally thrilled that my skin is still intact).

Anyway, we stripped it first, sanded it, sanded it some more, then wiped it down with mineral spirits and it was ready to go.  I decided to do spray paint on this project, inspired by Brooke over at All Things Thrifty.  She has some awesome painting tips, including a whole section on spray paint.  You can find it here.


Sanded and ready

I chose to use Rustoleum's heirloom white spray paint and I really love it!  I didn't realize there were some metal decorative parts on the table until I started sanding it.  At first I was bummed, but I decided to tape them off and keep the metal look; I like how it turned out.  It gives it some character.  One of the things I really love about this table is that it's LARGE, much like our sofa, so it's a perfect fit!  I also love the extra shelf, where I can keep a basket for magazines and books (that I picked up for FREE at a military thrift store in Vegas).

That's the story of my $5 table, and here are some pictures for you to enjoy.

Decorative metal on the legs

Original hardware


LOVE this basket!

The accessories, for now

Had to include a close up of my all-time favorite picture, taken by our sweet friend in San Diego.
I'll be linking this up to Miss Mustard Seed today.  Be sure to head over and see some awesome furniture re-dos, and check out Miss Mustard Seed's blog!

Also, linking to:

three boys