Pages

Friday, December 30, 2011

Birth Story of Daughter #1

Yesterday marked a special day in our family:  our oldest turned 3 years old!  She has been such a blessing in our family and I thought I would take a few minutes to share with you the story of her entry into the world.  Most women {which I think most of you readers are} love a good birth story, and I've never before shared this on my blog, so what better time than now?  In fact, three years ago today I was sitting in a hospital bed writing down the story in my journal.  Come back with me a few years as I remember the day I became a mother...


May 8, 2008:
That morning I took a pregnancy test and my suspicions were confirmed that I indeed was pregnant!  We were thrilled!  My first trimester wasn't horrible, and I was working from home at the time, so it was easy to nap whenever I wanted, eat whatever was in sight {which I did} and enjoy having my husband home.  The due date was set for January 6, 2009.


July 21, 2008:
My husband left for training with the Navy, and I moved from our home in SC, to live with my parents in VA. Life was a bit uncertain at this point, not knowing when we would be together again, where we would live next, and whether or not Bradley would be with me for the birth of our first baby.  But, we trusted that the Lord would take care of it all and there was no need to fear.

December 20, 2008:
I finally picked Bradley up from the airport for our 2 week time together before he officially moved to San Diego to report for duty.  I was hugely pregnant, he was exhausted, and we were hoping and praying that our little baby would arrive early so he could be present when she was born.  We enjoyed a few days before Christmas with both of our families, and then settled in to wait for things to start happening.

December 26, 2008:
I had contractions ALL day long, about 3 minutes apart, so we finally went to the hospital in the afternoon, bags packed, ready to meet our baby.  After walking the hospital halls for a couple of hours, my contractions weren't getting any more intense, so they sent me home.  Ugh!  Anyone else who has had false labor knows that is one of the most discouraging things to hear!  Thankfully, I had dilated to 3 centimeters, so something was happening, just not enough.

December 28, 2008:
Around 10AM, Bradley and I were getting ready for church when I felt my water break.  Yes!  I had been told to come to the hospital if that happened, and I knew that once my water broke they'd have to get the baby out within 24 hours.  God had answered our prayers, and Bradley would be with me for the delivery!!

Checked in and waiting for things to start picking up.
We arrived at the hospital, got settled into our room, and the midwife finally showed up to completely break my water, and once she did the contractions started coming.  Around 5PM. the contractions began to pick up and I was pretty uncomfortable.  My goal was to have a natural delivery, no drugs, mostly because I HATE needles, and couldn't stand the thought of having a long needle in my spine.  My husband, and my parents, were fantastic labor coaches and got me through the long hours of contractions until about 10PM, when I was finally at 9 centimeters and ready to push.  This is when it got difficult.

Don't you just love those hospital gowns?  
I pushed, and pushed, and pushed, and nothing really happened.  After about 3.5 hours, the midwife finally called a DR to come because they were going to have to vacuum out the baby {I guess a midwife is unable to do that}.  I was exhausted, sweaty, and just ready to get that child out of me!  After about 30 minutes, including one point when my husband thought the baby's head had been ripped off from the vacuum, we finally met our sweet baby GIRL, Isabella Claire, at 1:51AM, December 29.

Moments after birth

Holding her for the first time

Daddy and his little girl
My parents, aka Nini and Granddad
Family of 3
Never have I felt such amazing relief and joy than I did in that moment.  Immediately I began crying because I was so thankful that Bradley had been with me to meet our precious girl for the first time.  God's faithfulness to us was incredible, and I will never take that for granted.  Isabella Claire was 8 days early, and just as perfect and beautiful as ever.  She weighed in at 7lb. 14 oz., and 20 1/2 inches long {I think; not sure about the length}.

I finally asked to look in a mirror and almost didn't recognize my face.  After pushing for 4 hours, my entire face had swelled, and I had burst multiple blood vessels in my face and eyes.  Not the way you picture looking for those first photos with your new baby.  But, oh well!

My parents and siblings had all waited long hours to meet our baby, and they came in soon after to delivery to see our sweet girl.  


We spent 2 full days in the hospital and then went back to my parents' house where we enjoyed another three days before Bradley left for San Diego.  That was a difficult day, especially for him, but we were still so thankful that he had been able to be there for Isabella's birth.  {We were reunited 3 weeks later when Isabella and I moved to San Diego to join him}.

Feeling better the next day
Heading home
Saying Goodbye for 3 weeks
Isabella has brought us such joy over the years and we are proud to call her our daughter.  Our biggest prayer for her is that she will grow to know and love Jesus, and desire to follow Him with wholehearted devotion.


Happy 3rd Birthday, Isabella!

Wednesday, December 28, 2011

Top Ten Posts of 2011

As we approach the close of 2011, I thought it would be fun to look back on my posts from this year and see which ones made the 'top ten' list.  These posts are ones that have received the most views from readers, so you all have generated this list!  Some of my personal favorites didn't make the cut, but that's okay; hope you enjoy looking back with me on my 'Posts in Review'.


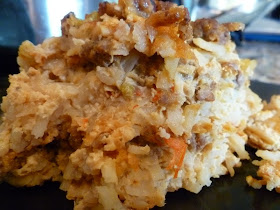
#10:  Crockpot Breakfast Casserole.  This recipe is so easy and people that have eaten it love it!


#9: Christmas Tablescapes.  This is a collection of tablescapes from our church's Christmas dinner a few weeks ago.  I was inspired by the creativity of the women from our church.


#8: Slipcovered Parsons Chairs  This is one of my favorite projects that I've ever done!  I always wanted upholstered dining chairs and when I found this set on Craigslist I bought them right away.  We love eating in our comfortable dining chairs.


#7: $6 Knock-off Pottery Barn Chandelier  Our builder grade chandelier got a quick makeover with some new shades and burlap.


#6: Holiday Entertaining: Out of Town Guests  We had tons of company over the past month so I came up with some tips on how to best prepare for out of town guests.  It doesn't just apply to the holidays, so if you're getting ready to host company soon, this post is for you.


#5: Anthro-Inspired T-Shirt Refashion  I haven't sewed a lot of clothes this year, more just items for our home, but this was one item that I did complete.


#4: Cheddar Bay Biscuits  These are the. best. biscuits. ever.  If you're making soup this winter, you MUST add this to your menu.  Your people will eat them up.  Every week I get several hits on this post from google searches.  Trust me, they're awesome.


#3: Meal Planning Part 2: Grocery Shopping  I started a series over the summer, per the request of a reader, about meal planning.  Truth is, I never actually wrote the Part 3: Planning Meals!  That will come soon, I promise!  I got pregnant in the middle of the series and my meal planning sort of went out the window.  I wasn't able, in good conscience, to write a post about planning meals when I wasn't doing it.  I've been getting better so I'll finish that series in 2012.


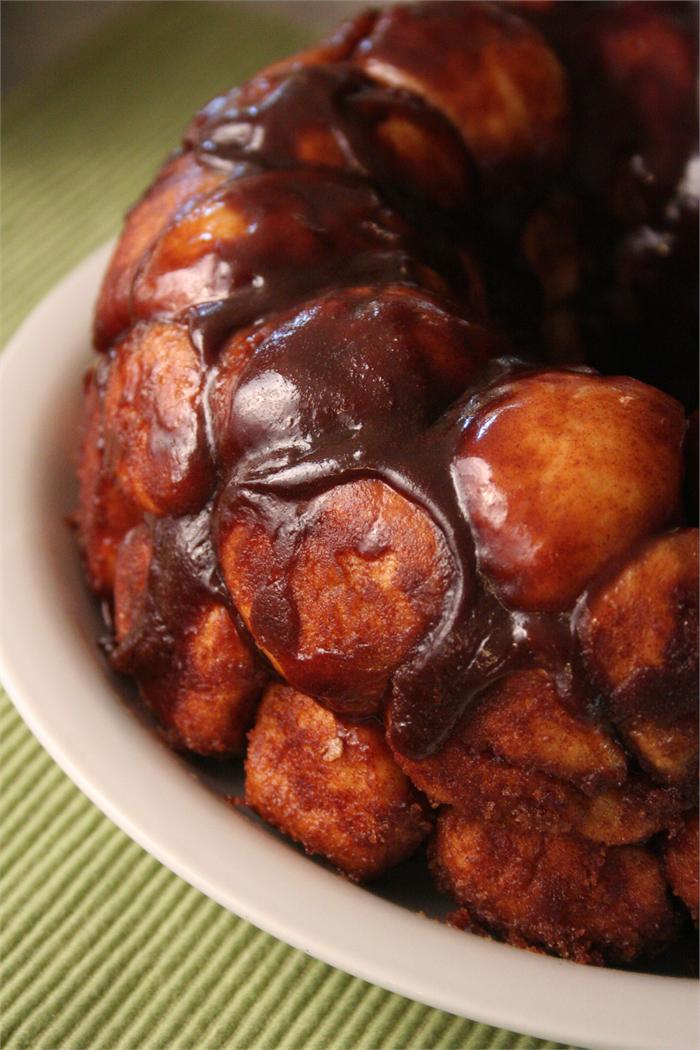
#2: Butterscotch Monkey Bread  This is actually one of the few recipes on my blog that isn't from scratch, but it really is awesome!  Faith, over at thekitchn, was kind enough to feature it in a roundup of 15 Monkey Bread recipes, so I've received quite a bit of traffic from that.  Thanks, Faith!


#1: Easy Drapery Panels  I shared a tutorial on how to make simple panels; mine are hanging in the Dining Room.  Confession:  I decided they are too short, so I'll be adding some fabric to them soon to give them a bit of length.  Some projects just never seem to be complete...


There you have it, my year in review!  Thanks to all of you for reading my blog!  It has been a fun journey for me to document my work in my home on this blog.  You encourage me by reading my blog, commenting on the projects, and sending me sweet messages about how you enjoy what I write.  I'm looking forward to some more great projects in 2012 and hope you'll join me for another year!

Linking to

Tuesday, December 27, 2011

Asparagus Bites: Quick 3 Ingredient Appetizer

"What are ya doin' New Year's, New Year's Eve?"

Do you know this song?  That's the only part I know, and I remember my dad singing it almost every year, about this time, as we discussed our plans for New Year's Eve.  At this point, I don't have any plans, and that's OK with me.  If something comes up, great, but if not, I'll probably be in bed at my usual 9:30 bedtime, reading a good book, enjoying the peace and quiet.  For those of you who have a party to attend, this is one of the easiest appetizers to make!  With just three ingredients, you can put it together in about 20 minutes, and everyone will love it.  {My 2 year old devoured these!}


Asparagus Bites

16 oz. packaged deli ham {the rectangular kind works best}
8 oz. cream cheese {not cream cheese spread}
can of asparagus {you could try fresh asparagus too}

In a microwaveable bowl, soften the cream cheese so that it is easy to spread.  Lay ham out on a clean work space.  Spread with a layer of cream cheese. Place one asparagus spear on one end of the ham and roll up.  Refrigerate for 1-2 hours, until cream cheese hardens again.  Place rolled up ham slices on cutting board, and slice with a serrated knife into bite size pieces.  Arrange on platter and serve chilled.

source: my sweet mother-in-law {she made these for us when she was here a few weeks ago}

Saturday, December 24, 2011

Merry Christmas!


Wishing you all a blessed Christmas!  May you be reminded of the greatest gift ever given in the birth of Jesus, this Christmas season.  Our hearts are full as we celebrate the life we've been given through Christ.  

Love, 

Lauren

Friday, December 23, 2011

Sew Your Own Ruffled Christmas Tree Skirt

If you've spent much time on Pinterest looking for Christmas inspiration, you've most likely stumbled upon a tutorial for a no-sew ruffle Christmas tree skirt, by Miss Mustard Seed.  Many people have recreated it and I love each version.  So, I decided to make one of my own, but I changed it up a bit to save some money and supplies.  I love the elegance, and yet simplicity, that it adds to my tree and am thankful to finally have an actual skirt rather than a random piece of fabric curled around the base of the tree.

The original tutorial {which you can find on HGTV.com} uses a drop cloth and strips of linen fabric.  Instead of sewing the linen onto the fabric, Marian hot glued it all around so that no sewing is required.  I didn't want to use that much hot glue, plus I thought it would take me forever, so I made mine a non-no-sew {yes, I just used a double negative}.


I went to my local fabric outlet to find some fabric remnants {this should always be your first step with a sewing project, if you have an outlet near you.  I wrote some tips in this post}, and picked up a piece of cream colored canvas {identical to a drop cloth} and some satiny cream colored fabric.  The cost for both was around $15, much less than if I had purchased actual linen fabric, which runs from $6-$12/yard.

I followed the first instructions in the tutorial, cutting out a circle from the canvas, and cutting my satiny fabric into 2-inch strips.  Then, I changed it at this point by doing the following:

1. I took the strips of satiny fabric and pinned them one-by-one onto the canvas fabric,beginning on the outer edge of the circle, folding them to create a pleat.


2. I repeated this all the way around, adding strips of fabric as needed to finish that row.


3. I then sewed at the top edge of the pinned fabric, making sure to keep the pleats I had made.  Once a row was sewed on, I began another row, pinning the fabric about 1 1/2 inches above the last row.  This kept the stitch line covered by the next row of fabric.


Halfway done

You can see how the rows cover up the stitching

I folded the fabric under at the edge of the circle to make it seem more finished

Love the ruffles!

I will admit this was quite time consuming, but I felt like it was totally worth it, because I love the finished product!  I've been wanting a tree skirt for years, and now I have one that I can use forever!

I had meant to have this tutorial for you a few weeks ago, but as you can see from my post yesterday, I've been napping instead.  So, if you feel inspired to make one of these, count on the holiday sales at your local fabric store that are coming up soon and save up the materials to make one next year!

Only presents so far are from my sister

My silly girls in front of the tree


Now, this afternoon, I must tackle the stockings that are almost complete.  Hopefully, I can show you those tomorrow.

What last minute projects are you still trying to complete, or am I the only one waiting until the last minute?


Linking to:

Home Stories A2Z

Thursday, December 22, 2011

I'm Back!

I can't even believe that it's been over 2 weeks since I posted on my blog!  We've had a busy time around here, with company for 2 weeks and then my husband's work schedule changed.  I haven't adjusted so quickly to the new schedule, plus I'm exhausted from all of the busyness around here, so what have I been doing?  Well, I haven't been: sewing our stockings, buying Christmas presents, wrapping presents, baking Christmas goodies, or listening to Christmas music.  Instead, I've been doing quite a bit of this:


I have to admit, it feels pretty good!  I think I'm ready now to tackle the last minute preparations for Christmas {only 4 days away!}, so I hope to be showing you some of the things that I've created and get back into the swing of blogging.

I hope you're enjoying this Christmas week!  I'll be back later today {or tonight} with a tutorial for you on something I've made, that I absolutely LOVE!

Happy Thursday :)

Monday, December 5, 2011

Christmas Tablescapes

Last night our church held its annual Christmas dinner/concert, and it was wonderful!  This was our first year at the church so I wasn't sure what to expect, but I had heard that the food is always outstanding, and the decorations amazing.  I was not disappointed.  The beauty of the table decorations was that each table was decorated differently, by someone in the church.  We could sign up to bring our own dishes, silverware, glasses, and any table decor, and then we were in charge of decorating that table.  Not only is this fun for the ladies who participated, but it's also great on the church's budget!  No cost for table decorations or dishes, and we each cleaned our own dishes at home, so that saved on time and volunteers at the church.  I thought I would highlight some of the tables and point out what I liked about each one.  Hopefully, this will give you some ideas, if you're still considering how to decorate your table for the holidays.  Enjoy all the pictures!

This feather tree ensemble was really fun!  I'm not sure if she made these trees, but it would be an easy DIY project.  The ornaments and glass pieces nestled in the red fabric were beautiful.


This table had a great mix of traditional china with a modern centerpiece and it was pulled off beautifully!  Square placemats worked well on a round table.  I took these pictures before they dimmed the lights, so you can't see the full effect here, but there were little blue led lights under the silver trees and when they were lit added such a nice touch.


One of my friends decorated this table and I love how fun it is!  I love the dishes {from Target} and the table scarf and ribbon napkin rings glittered nicely.  Clear marbles held a silver tree/branch in place--great way to keep the color scheme while making it practical.


 I was a bit tempted to sit at this table so I could munch on candy during dinner.  What a fun way to incorporate the reds and greens of a traditional Christmas.


Some tables had favors for each guest, as you can see from the ornaments here.  I like how the ornament is incorporated into the napkin.


I LOVE the blues and silvers that are used in Christmas decorating.  This table was gorgeous and tied together so well from the napkins to the china, silverware, and centerpiece.  Beautiful.


I really love the centerpiece on the this table.  Simple, fun and classy.  Plus, each guest received a little package on their plate.


My friend, Cassidy, decorated this table and did a great job!  Her colors go together so well and I love that she added a Christmas word to her centerpiece.  The oversized ornaments are beautiful and I love the way she stuck little favors inside of the glasses. Great idea!


I had to include this tower of ornaments, as it would be simple to create this on a cake stand.  Throw in some fresh greenery and you're set!


This next table was mine.  I decided to go 'low budget' and opened up my sewing closet to see what I could find.  I discovered a piece of lime green fabric and then in my clothes' closet found a black scarf from a bridesmaid dress.  With a few silver ornaments, my china, some ribbon, and black placemats borrowed from a friend, I was done.  I had  a million ideas I wanted to recreate, but this one was quick, easy, inexpensive and I love the green/black/silver combo.


This table was truly stunning!  Even the wrappers on the candy tie in so nicely with the detail on the china.  Beautifully done!


So, there you have several tablescapes to inspire and enjoy.  What is your holiday table going to look like?


The Lettered Cottage