I wish I could have transported you to my kitchen yesterday while my bread was baking in the oven. But since that isn't possible, and smells cannot be shared via the internet, I'll just share this easy bread recipe with you. Making homemade bread does not have to be a long process. In fact, if you've never tried it before, this recipe is a perfect place to start, because you'll have some fresh baked bread in about 2 1/2 hours, with only 30 minutes or so of hands-on time. My only warning is that if you make this for those you love, you might never be allowed to buy bread from the store again!
Recipe:
6 to 7 cups all-purpose flour
3 tablespoons sugar
1 tablespoon salt
2 tablespoons shortening
2 packages regular or quick active dry yeast (4 1/2 teaspoons)
2 1/4 cups very warm water
Mix 3 1/2 cups of the flour, the sugar, salt, shortening and yeast in a large bowl. Add warm water. Beat with electric mixer on low speed 1 minute, scraping bowl frequently (this step is important because some of the flour will remain on the sides and bottom of the bowl!). Stir in enough remaining flour, 1 cup at a time, to make dough easy to handle.
 |
| Should look something like this |
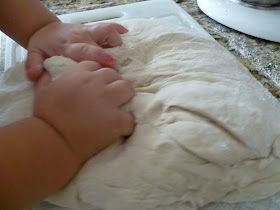
Place dough on lightly floured surface. Sprinkle flour on top of dough mound, and then begin to knead until it is smooth and springy.
 |
| Add more flour as needed if dough is too sticky |
 |
| Little hands make great dough kneaders! |
Place dough in large bowl greased with shortening, turning dough to grease all sides. Cover bowl loosely with plastic wrap and let rise in a warm place for about an hour, until double in size. *Tip: place your bowl on top of the stove and turn on your microwave light--if you have one--this provides heat and I have found makes it rise more quickly.*
 |
| Doubled |
Grease bottom and sides of 2 loaf pans, 9x5x3, with shortening.
Gently push fist into dough to deflate.
Divide dough in half. Flatten each half with hands and shape into a rectangle on a lightly floured surface.
 |
| A perfect rectangle shape is not required |
Roll dough up tightly and seal the ends.
 |
| Pinch the ends together |
 |
| Shape it somewhat and center it in the loaf pan |
Fold ends under loaf and place, seam side down in the pan. Cover loosely with plastic wrap and let rise in a warm place for 35-50 minutes, until double.
 |
| Doubled |
Move oven rack to low position so that the tops of the bread are in the center of the oven. Heat oven to 425F. Bake 25-30 minutes until loaves are deep golden brown. Remove from pans to wire rack.
 |
| Don't worry if your loaves don't look perfect! Mind sure didn't! It's the taste that everyone cares about. |
Source: Betty Crocker's Cookbook


I haven't made homemade bread in months - I need to get on that! Maybe I will try this recipe next. I love seeing those little hands kneading the dough!!
ReplyDeleteI've never made homemade bread...and I must say that I'm a little scared...but now that you've posted this maybe I should give it a shot!
ReplyDeletei love the shot of the little chubby baby hands!! Too cute!
ReplyDeleteThere is something so gratifying about making your own bread. I don't do it much, but it I do enjoy it! Love your blog, new follower.
ReplyDeleteI came across your blog while looking for "easy bread scratch." My intention was to entertain the toddler; I never dreamed it would turn out. It was delicious, easy, and kept busy boy entertained on and off through the whole process. Thank you for sharing! We will definitely make again (soon, we are almost out).
ReplyDelete