Pages

Thursday, June 30, 2011

Homemade Bread for the Beginner


I wish I could have transported you to my kitchen yesterday while my bread was baking in the oven.   But since that isn't possible, and smells cannot be shared via the internet, I'll just share this easy bread recipe with you.  Making homemade bread does not have to be a long process.  In fact, if you've never tried it before, this recipe is a perfect place to start, because you'll have some fresh baked bread in about 2 1/2 hours, with only 30 minutes or so of hands-on time.  My only warning is that if you make this for those you love, you might never be allowed to buy bread from the store again!

Recipe:
6 to 7 cups all-purpose flour
3 tablespoons sugar
1 tablespoon salt
2 tablespoons shortening
2 packages regular or quick active dry yeast (4 1/2 teaspoons)
2 1/4 cups very warm water

Mix 3 1/2 cups of the flour, the sugar, salt, shortening and yeast in a large bowl.  Add warm water.  Beat with electric mixer on low speed 1 minute, scraping bowl frequently (this step is important because some of the flour will remain on the sides and bottom of the bowl!). Stir in enough remaining flour, 1 cup at a time, to make dough easy to handle.

Should look something like this

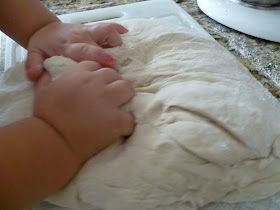
Place dough on lightly floured surface.  Sprinkle flour on top of dough mound, and then begin to knead until it is smooth and springy.

Add more flour as needed if dough is too sticky

Little hands make great dough kneaders!


Place dough in large bowl greased with shortening, turning dough to grease all sides.  Cover bowl loosely with plastic wrap and let rise in a warm place for about an hour, until double in size.  *Tip:  place your bowl on top of the stove and turn on your microwave light--if you have one--this provides heat and I have found makes it rise more quickly.*


Doubled


Grease bottom and sides of 2 loaf pans, 9x5x3, with shortening.

Gently push fist into dough to deflate.


Divide dough in half.  Flatten each half with hands and shape into a rectangle on a lightly floured surface.

A perfect rectangle shape is not required

Roll dough up tightly and seal the ends.


Pinch the ends together 


Shape it somewhat and center it in the loaf pan

Fold ends under loaf and place, seam side down in the pan.  Cover loosely with plastic wrap and let rise in a warm place for 35-50 minutes, until double.

Doubled


Move oven rack to low position so that the tops of the bread are in the center of the oven.  Heat oven to 425F.  Bake 25-30 minutes until loaves are deep golden brown.  Remove from pans to wire rack.

Don't worry if your loaves don't look perfect!  Mind sure didn't!  It's the taste that everyone cares about.


Source: Betty Crocker's Cookbook

Monday, June 27, 2011

Chocolate Peanut Butter Cookies


Chocolate and peanut butter has to be one of the greatest dessert combinations ever invented.  These cookies are more proof of that fact.  Grab a glass of milk and enjoy!


Recipe:
1 1/2 cups all-purpose flour
1/2 cup unsweetened cocoa powder
1/2 teaspoon baking soda
1/2 cup butter, softened
1/2 cup, plus 2 tablespoons sugar
1/2 cup packed brown sugar
3/4 cup peanut butter
1 egg
1 tablespoon milk
1 teaspoon vanilla
3/4 cup powdered sugar

In a medium bowl stir together flour, cocoa powder, and baking soda.  Set aside.  In a large mixing bowl combine butter, the 1/2 cup granulated sugar, brown sugar, and 1/4 cup of the peanut butter; beat with mixer until combined.  Add egg, milk, and vanilla; beat well.  Beat in as much flour mixture as you can with the mixer.  Using a wooden spoon, stir in any remaining flour mixture.  Shape dough into 28 balls, each about 1 1/4 inches.  Set aside.

For the filling, in a bowl combine powdered sugar and remaining 1/2 cup peanut butter.  With mixer beat until smooth; knead by hand if necessary.  Shape into 28 balls.

Preheat oven to 350F.  On work surface, flatten a chocolate dough ball; top with peanut butter ball, completely covering peanut butter ball; reshape into ball.  Repeat with remaining balls.

Place balls 2 inches apart on a cookie sheet.  Flatten with bottom of a glass dipped in the 2 tablespoons sugar.  Bake 8-9 minutes.  Let stand 1 minute, then transfer to racks to cool..

Source: Better Homes and Gardens, March 2007

Friday, June 24, 2011

Run, Mama, Run!

I'm re-posting this post from June today to link up to Beth's party, My Favorite Post of 2011.  No, it's not a project I completed for my home, but it was a post that I wrote as an inspiration for others who don't enjoy running that they might be challenged and encouraged to exercise.  


I did run the 10 mile race I mention below, and I was 9 weeks pregnant.  For those of you who are setting new goals for 2012, may this be an inspiration and encouragement to you to start now, and you can do it!


While we were in Florida this past week, my husband found a sign for a 5K and decided he wanted to do it.   So, we got up early on Saturday morning, registered for the race, and I'm proud to say that I ran a 5K!
Here we are after:


The first time I started running was a little over six years ago, while living in Jordan.  There was an ultra marathon/marathon/10K/5K that went from the capital, Amman, down to the Dead Sea.  How could I not participate in that?  So, I began training for the 10K portion of the race and completed my first 10K, along the Dead Sea.  I haven't had any exotic running experiences since then, but I've tried to run from time to time, and have never enjoyed it!  I always love how I feel after I run, but the process is not pleasant for me.

After I miscarried Baby #3 in March, I decided that it was time for me to get back in shape.  Sure, I could fit into most of my pre-pregnancy clothes, but they just didn't fit the same.  If you've had children, you know what I'm talking about.  New bulges appear, your skin stretches out--everything sort of just shifts around.  I think I'm most sad about losing my belly button; it's no longer a goblet (Song of Solomon reference, in case you were wondering).  With both of my first two pregnancies I gained 50 pounds, and with the 3rd, I had still gained about 10 pounds by the time I miscarried.  I'm not one of those blessed women who can come home from the hospital and look like they never had a baby.  So, I still had some weight to lose and I decided it was time to do something about it!

So, how did I get started?  I set a goal:  Run a 10 miler.  Yes, it's rather ambitious, but I needed something to work toward.  Every year in my parents' town there's a 10 mile race.  I've always wanted to do it, but not being a runner it wasn't really an option.  I figured by giving myself a good 5-6 months to train I could certainly pull it off.  Plus, I have several women in my life that are my running inspirations: my mom and her friend, who are in their 50's, and run between 10-15 miles a week; a friend of mine who ran a marathon 7 months after having a baby; countless other friends who run regularly and amaze me with their discipline!

The most challenging aspect of training for me has been the heat (that and the fact that I don't enjoy running!).  Some days I'm out running and it's close to 100F!  What was I thinking?! is usually what goes through my mind on those days.  But then I hear my husband's words of encouragement that I'm being consistent with exercise, and I hear him saying that he notices I'm losing weight in certain areas, (he also mentioned that my behind was a bit firmer--come on, ladies, what husband wouldn't want that!  And what woman wouldn't want to hear that!).  And when I come to the end of my 3-mile loop, I hear my little girls yelling, "Run, Mama, Run!", and I remember another reason why I'm running.  I want to be in shape and healthy enough to enjoy them as they get older.  I want my children to see an example of a well-disciplined life, in all aspects of my life.  And so, I run.

If you've been feeling the need to get back in shape, here are my tips for you:
1. Set a goal.  You can start out small, like taking a walk once a day, 3 times a week.

2. Find a race and sign up.  Most running races have a walking portion as well, so you don't have to be a runner to do this.  Having a race that you're working toward has been a huge inspiration for me.  And if you register for it, you have to pay, so that sort of commits you!

3. Get a friend to help you.  "Iron sharpens iron..." so find someone who wants to get in shape too and keep each other accountable.  If it's convenient, walk or run together.  (Some ladies from our church here recently trained and ran a 5K together--that would be a great ladies' night out activity!)

4. Enlist the support of your husband.  When I shared my desire to get in shape with my husband, I told him that I would need his help in watching the kids.  There was no way I was going to train for a 10-miler pushing a double jogging stroller!  He has willingly and eagerly assisted!  And, I'm sure your husband would do the same!

5. Start now!  It's easy to say, "Oh, I'll do that next week, " or, "I'll wait until July so I can start at the beginning of the month."  We all know that procrastination doesn't pay off.  So, start today!


*Edited on December 27, to add the following:
I did run that 10 mile race mentioned above, and I was 9 weeks pregnant.  For those of you who are setting new goals for 2012, may this be an inspiration and encouragement to you to start now, and you can do it!

Linking to:
Home Stories A to Z, My Favorite Post of 2011

Thursday, June 23, 2011

Pound Cake French Toast with Peach Compote


Have you ever felt guilty about eating leftover dessert for breakfast?  Well, this recipe will give you a perfect excuse, because it is dessert transformed into a breakfast food!  The peach compote would also be delicious served over ice cream.

Ingredients:
4 slices leftover pound cake (preferably homemade, of course)
2 eggs
4 tablespoons milk
4 peaches, thinly sliced
1 tablespoon lemon juice
1/4 cup brown sugar
1 teaspoon cinnamon
powdered sugar

In a small bowl, combine the sliced peaches, lemon juice and brown sugar.  Let this rest for about 5 minutes, so that it can create some good juices.


Place peach mixture in a medium-sized skillet and cook over medium-low heat for 10 minutes.  Reduce heat and simmer for another 10 minutes, until the peaches are warm and the juice is a bit thickened.


Slice the leftover pound cake into 1-inch slices (approximate).


Beat together the eggs and milk.  Dip each slice of cake into the egg mixture, coating both sides.  Handle carefully so the pound cake does not fall apart.


Place coated cake onto griddle and cook over medium-high heat, 2 minutes per side, until golden brown.


 Remove from griddle.  Top with peach compote and sprinkle with powdered sugar.


This recipe will serve two.  If you have more cake leftover, simply use 1 egg and 2 tablespoons of milk per 2 slices of cake and adjust the recipe accordingly.


I'm linking up these blogs this week:

Under the Table and Dreaming
Home Stories A to Z

Fresh Flowers from the Garden

When we were in Pennsylvania a few weeks ago, we drove a moving truck home full of furniture and other items from my in-laws' house.  Included in our 'goods' were tons of plants for our yard!  My mother-in-law has an amazing green thumb and has been starting plants for us since we found out we would be buying a new home.  Yesterday I was able to go out to the yard and cut some fresh hydrangea blooms!


I love having fresh flowers in my kitchen (since I spend most of my time there) and it's even more exciting to know that they've come from straight from my yard and not the grocery store!  I'm just hoping that I'll be able to keep the hydrangea plants alive in the years to come!


I tried something different with the leaves.  I lined the inside of the vase with leaves and I like the extra green that it adds to my vase.


On another note, I spent a good portion of yesterday working on the dining room chairs and I'm loving how they are turning out.  Here's a sneak peek at some of what I've done:


Hopefully by the end of the week I'll be able to show you the finished product!

Wednesday, June 22, 2011

Chicken Breasts with Tomato, Basil, and Roasted-Corn Relish


Our garden is doing beautifully and I love the fact that I can walk outside, pick something from the garden, and bring it in to eat it for dinner.  I was able to use tomatoes and basil from our garden for this dish.  This is an easy one to make, but it looks like it took a long time--a perfect combination in my opinion!  And to top it off, it's quite healthy.

Recipe:
3 tablespoons olive oil, divided
2 ears fresh corn
3 medium tomatoes
1 green onion stem
12 basil leaves, approximately
4 large skinless boneless chicken breasts
flour
1 1/2 tablespoons unsalted butter
1 1/2 tablespoons olive oil

For the Relish:
Preheat oven to 375F.  Brush rimmed baking sheet with 1 teaspoon oil.  Using a sharp knife, cut off the kernels from the corn into a small bowl.


Toss corn with 2 teaspoons oil and place on baking sheet.  Roast until corn begins to brown, stirring occasionally, about 18 minutes.


While the corn is roasting, dice the tomatoes.


Then, slice the green onion.

Next, slice the basil into thin strips.


Mix the roasted corn with tomatoes, green onion, basil and 2 tablespoons olive oil; season with salt and pepper.   Set aside.


For Chicken:
Flatten the chicken breasts out as well as you can (you can do this with a meat mallet, by putting the chicken between two pieces of saran wrap, but it works just as well if you simply stretch it with your fingers) until they are about 1/2-inch thick.  Pat chicken dry.  Sprinkle with salt and pepper, then coat with flour.

Melt butter and oil in a heavy skillet over medium-high heat.  Add chicken and saute' until cooked through, about 5 minutes per side.

Transfer to plates, top with relish and serve.


Recipe adapted from Bon Appetit, 2005

Tuesday, June 21, 2011

Roasted Vegetable Meatloaf


We came home last night to a garden that is producing some great vegetables!  I can't wait for everything to start coming in.  There were 3 zucchini, just the right size for this meatloaf recipe I've been wanting to try.  If you like roasted veggies, then you will love this recipe.  Don't be scared of vegetables in your meatloaf, it really is great.  My 17 month old LOVED it!


Recipe:
3 small zucchini
2 red peppers
2 red onions
2 tablespoons olive oil
1 teaspoon dried rosemary

2 pounds ground beef (the fattier the better, so that the meatloaf will be moist)
2 cups mozzarella cheese, shredded
1 1/2 cups bread crumbs (fresh or panko--I used fresh)
1/2 teaspoon dried basil
1/2 teaspoon dried marjoram
1 teaspoon salt
1/2 teaspoon ground pepper
1/2 cup ketchup
2 large eggs
1/4 cup sherry

Preheat oven to 450F.  Dice all the vegetables and place in a large mixing bowl.
Love all these colors!
Add olive oil and rosemary; toss to coat.  Spread evenly on a rimmed baking sheet; sprinkle with salt and pepper.


Roast until veggies are tender, about 25 minutes. Remove from oven.  Cool.

Preheat oven to 375F.  Mix beef, mozzarella, bread crumbs, basil, marjoram, salt and pepper, and 1 cup roasted vegetables in large bowl.


In a separate bowl, combine ketchup, eggs, and sherry.  Add this to the beef mixture and stir until well combined.  Put into a 9x5x3-inch loaf pan, forming a rounded top.

Mix together 1/2 cup ketchup, 1/3 cup, plus a bit more of brown sugar.  Spoon this over the top of the loaf.  Bake until cooked through, about 1 hour 10 minutes.  Let meatloaf rest for 20 minutes before slicing (or slice right away if you want crumbly slices--I didn't wait).

The glaze should look like this when done
Rewarm remaining vegetables in a skillet.  Turn meatloaf out, cut into 1-inch thick slices.  Top with warm roasted veggie mixture and serve with Mustard Mashed Potatoes.


Recipe adapted from Bon Appetit, March 2005

Mustard Mashed Potatoes


These potatoes are quite tasty!  The honey Dijon mustard adds a nice flavor if you want to 'shake up' your traditional mashed potato recipe.


Recipe:
2 1/4 pounds Yukon-gold potatoes, peeled and cubed
6 tablespoons melted butter
2/3 cup milk
3 tablespoons honey Dijon mustard

Cook potatoes in a pot of salted water until very tender, about 25 minutes.  Drain well.  Using an electric beater, mix butter and potatoes until potatoes are completely mashed.  Add milk and mustard, beating well.  Season with salt and pepper and serve with Roasted Vegetable Meatloaf.

Recipe adapted from Bon Appetit, March 2005

My Blogging Absence


If you read my blog on a regular basis, you've surely noticed my sparse writing and absence over the past few days.   We took a family trip to see my in-laws, and my husband's grandfather the first week of June.  We had a wonderful time with them, and knew that it would most likely be the last time we saw Grandpa.  He passed away the morning after we left.  The Lord was gracious to give us that time with him and we are thankful that he didn't suffer very long and he is now rejoicing in heaven with his Lord and Savior!

Grandpa was a pilot in the Navy, during WWII, so his burial service was held in Pensacola, FL, where he had been stationed.  We were able to travel to the funeral and then spent several days in a condo on the beach, with Bradley's parents, sister, and oldest nephew.  We had a wonderful time together remembering Grandpa, seeing some of the places where Bradley's mom had grown up, and just being together as a family.

Grandpa was a man of character who loved God, his family, and his country.  I am blessed to have known him and am grateful for the legacy he left behind.

Grandpa and Grandma, 2007

Thursday, June 16, 2011

Chocolate In-Betweens


This recipe is one of my absolute favorite bar-cookie recipes.  Not only are they delicious, but they have a sentimental value as well.  I can remember my grandmother serving these at family gatherings, and my mom would often make them for special occasions.  I don't know who to give credit to for this recipe; it's just one I copied out of my mom's files years ago.  So, credit will go to both my grandmother and my mom!

Recipe:
1 cup packed brown sugar
1/2 teaspoon salt
3/4 cup butter, chilled and cut into pieces
1 cup oats (quick or old fashioned is fine)
1 1/2 cups all purpose flour
1 cup semi-sweet chocolate chips (I used dark chocolate chips this time and they were good)
1 can sweetened condensed milk (14 oz)


Preheat oven to 350F.

Put brown sugar and salt into a bowl.  Using a pastry knife, cut in the butter chunks until the mixture is lumpy, but not a perfect ball.


Add flour and oats to mixture.  Use your fingers to combine.

Continue mixing until entire mixture is lumpy, and crumby (not sure if that is even a word, but you know what I mean).


Taste at least a small clump; it's wonderful.


I think I could eat this just by itself and be perfectly content.  In fact, this baked on a cookie sheet would probably be an awesome ice cream topping.  Just a thought....

Press about 2/3 of this mixture into a 9x13-inch pan.  Reserve the remaining crumb mixture.

In a small saucepan, combine the sweetened condensed milk and chocolate chips.


Heat over low heat, stirring constantly until chips melt.  Pour over crust in pan.


Sprinkle the remaining crumbs over top.


Bake until lightly browned, 25-30 minutes.  Makes 2 dozen 2-inch squares.  OR, cut them a bit larger and serve warm, with vanilla ice cream.