Pages

Monday, February 18, 2013

Toddler Bib from a Hand Towel


About four months ago, I stumbled upon a tutorial for a toddler bib by Amy at Positively Splendid.  I loved the she had a bib I could make following a simple pattern and applying bias tape.

I had read that children with Down Syndrome can have a difficult time learning how to eat, and that it can get pretty messy.  This is definitely the case with Mason.  He's a good eater, but we go through one bib at every feeding, and sometimes I feel like I should be wearing a bib too!  This toddler bib fits snugly around his neck, and covers his entire torso, keeping the food that spills out of his mouth on the bib {and occasionally on my shirt and glasses}.
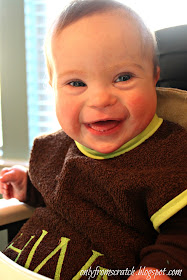
Pre-eating mess

All you need to make these:

-hand towel
-bias tape
-coordinating thread
-velcro
-pattern from Amy's tutorial


I followed Amy's tutorial almost exactly, including using her pattern.  However, instead of using snaps on the back like she did, I opted for velcro.  My only reasoning was that I had some on hand.  So, follow her tutorial, and if you want to use velcro instead of snaps, simply sew the velcro onto the back in the same placement as the snaps.


The armholes have a reinforced seam, keeping them well intact.


The pattern is stated to be toddler size, but it fits my 10 month old baby, and my four year old daughter, who modeled it for me.  She was a ladybug that day.


Appliques would be super cute on the front of these.  My mother-in-law happens to have an embroidery machine, so she graciously placed Mason's monogram on them for me.  Keeping it plain would work just fine, too!  This is a great gift and a perfect beginner sewing project.

Linking to:

Home Stories A2Z

Friday, February 15, 2013

No-Slip Baby Girl Hair Bows

One of my goals this year is to become a pro at making hairbows.  We live in the South, and although I don't require my girls to wear bows every day, or even to church every week, I do like to have a collection of bows for them to wear.  I've chosen not to fight this battle with them.  My 3 year old is a pig tail lovin' girl, and I'm okay with that.  

Believe it or not, I used to make and sell hair bows for a children's boutique when we lived in Monterey, CA.    It was a fun little side business, and because of that I now have quite a supply of alligator clips.  In an attempt to accomplish my goal, I decided to use up the remaining pieces of grossgrain ribbon I had on hand, and make some baby girl hair bows.  

This tutorial, from Make It & Love It, is excellent!  I love that no actual bow-making skills are required for these bows.  You simply loop ribbon, crisscross it, and hot glue it.  


They turned out really well and the best part is that they have a little secret material that keeps them from slipping out of your baby girl's hair!  Who would have thought that shelf liner would be used for our children's hair?  Well, it's the perfect solution for wispy little baby hairs.


In case you might be thinking this is some sort of announcement about Baby #4's gender, it's not.  These little bows are going to a friend of mine who had a baby girl not too long ago.  We won't find out the gender for a few more weeks {I procrastinated in scheduling my ultrasound--guess that's what happens the 4th time around}, but I'll be sure to let you know when we do!


These would make a great gift for a new baby girl, or just whip up a few for your own little one.  I'm now well on my way to meeting my goal of making hair bows.  I think for the next type, I need to actually learn how to make a bow. ;)

Happy Friday!

Wednesday, February 13, 2013

Homemade Baby Food: Strawberry, Blueberry and Apple Puree

Making baby food at home is a quick, economical, and healthy way to introduce solid foods to your growing baby.  I mentioned in this post some information on homemade baby food, including a great book that I found with tons of recipes.


As promised, I'm going to begin sharing some baby food recipes with you.  Some of these will be my own creations and others will be straight from the book I referenced previously.  I tasted this mixture after it was blended in the food processor and it was delicious.  I might even use this as a base for an adult smoothie one day.


One of the things to keep in mind when feeding solid foods to a baby, is that they need to eat foods alone before mixing together.  This helps to identify any food allergies a baby might have.  Strawberries tend to be a fruit that can bother children's skin easily.  So, when introducing strawberries, be sure to keep an eye out for a skin rash.


Strawberry, Blueberry and Apple Puree

1/4 cup fresh blueberries
1 cup chopped strawberries
1 apple, peeled, cored and diced

Place fruit in a small saucepan and cook over high heat for 2 minutes, then on low heat for an additional 5 minutes.  Pour into food processor and blend until smooth.  Put into containers to freeze.  Makes 4 servings of 2 ounces each.

To use, simply thaw in the microwave for 1 minute.  Serve alone, or mix with baby oatmeal or rice cereal.  If mixture is too thick for your baby, add a little bit of water.  


Friday, February 8, 2013

Tufted Rocking Chair Re-do

Several pieces of furniture in our home have been given to us by Bradley's parents.  Not family heirlooms, but special pieces that were made in Togo, West Africa, where they served as missionaries for 16 years.  I love our woven dining chairs that sit around our kitchen table, the teak rocking hippo in Mason's nursery, and now I'm really loving this teak tufted rocking chair that graces my Master Bedroom sitting area.


This rocking chair was upholstered by a gentleman in Togo.  He did an excellent job with the original fabric, matching it up perfectly, tufting it quite nicely, and placing some decorative nailhead trim along the back.  This is the only before picture I could find.


When I decided to tackle this project, I did what any normal person would:  enlisted the professional help of my mother-in-law!  She is an excellent seamstress, and has done much more work with upholstery than I have.  Boy, am I ever glad that she did this for me!  I think it would still be sitting in disrepair.


Growing up I would always want to help my dad with a project.  I remember distinctly wanting to help him dig fence post holes.  He looked at me and said, "Lauren, it's a lot harder than it looks."

Let me just tell you that tufting a chair and applying nail head trim are both 'harder than they look.'  Don't enter into these projects lightly!  Much time and care are needed.


My mother-in-law did all but three of the tufts, so I can't take credit for that.  She even covered the original buttons, so we saved some money there.  I purchased the fabric at my favorite fabric outlet in town, and only paid $11.  It's a nice ivory color with a very subtle herringbone print.  I like how it contrasts with the color of the wood.


Stapling the fabric to the chair was the easiest part, and there was no sewing involved in this re-do, which is always a plus!

The nail head trim was my least favorite part.  If anyone is considering using nail head trim, please purchase one of these:

source

It made the job much easier, and it only costs about $6 at Joann's.

Next time, though, I think I'll splurge and buy this kind of nail head trim:

source
This is a 6' long piece of trim that you apply, hammering an additional nail every 5 nails.  It helps to keep the nails perfectly spaced and go in at the correct angle.  For $12, it might be worth it.

This kit, for $19, would also work:

source


You can see why this would be helpful for me:


I used a measuring device to place the nails equally apart, but even with that, they would hammer in the wrong angle, making them go in the wrong spot.  I probably should have gone back and fixed the ones that were incorrect, but the back of the chair faces the wall, so I'm going to live with it for now.  Plus, this way if I ever try nail head trim again, I can compare to my first nail head job.


Our Master Bedroom is coming together!  I'm still on the hunt for the perfect comforter/duvet.  And, I'm hoping to fix my bedskirt, which is not the right size and needs some ribbon to finish it off.  Slowly, slowly, things are getting done.  I hope to finish a lot of these final projects before our baby comes in July.  If I manage my time well, it should get accomplished in five months' time.

Happy Friday!

Linking to:
Furniture Feature Fridays